
LiPo Batteries
A guide on LiPo batteries and safe handling
Intro
Battery charging is an essential part of flying drones, but also one of the most complex and potentially dangerous aspects if misunderstood.
Lithium batteries are everywhere nowadays - phones, laptops, portable speakers, and all kinds of gadgets use them.
What makes the batteries we use in FPV different is that they do not have a built-in BMS (Battery Management System).
They’re essentially bare Lithium Polymer cells wired to an XT60 pigtail and a JST connector.
You are responsible for handling the battery correctly, charging it with the proper settings, and most importantly detecting when something starts to go wrong (if it ever does).
Danger
Lithium batteries can become very dangerous when handled improperly. Improper care can lead to fire and toxic fumes, resulting in personal or property damage. Please understand the risks before handling batteries.
What are LiPos?
Lithium Polymer batteries, usually called LiPos for short, are a type of Lithium battery. What differentiates them from Lithium Ion batteries (apart from the chemistry) is their:
- Discharge Rate (C-Rating): LiPos can deliver bursts of hundreds of amps; Li-Ions are mostly used for steady loads such as phones or computers.
- Weight & Energy Density: LiPos of the same capacity are much lighter than their Li-Ion counterparts. This makes them ideal for FPV drones, as we always try to make our quad lighter and more maneuverable.
Why no protection circuitry?
This is a common question that people ask when they first learn that most batteries used in FPV don’t have any protection circuitry and wonder why this is the case.
Put simply, FPV drones draw a lot of current in bursts, and a BMS board with MOSFETs big enough to handle such currents would be both expensive and heavy.
Unlike your phone or computer which might draw a couple of amps constantly, an FPV drone can pull up to 200A in less than a second.
LiPo batteries are designed for these bursts; most BMS boards are not.
To clarify: The lack of BMS does not make the batteries inherently dangerous, it just moves that work to you.
Understanding specifications
For safe handling of LiPo batteries, it is crucial to understand the specifications of the battery, like its cell count, capacity, voltage, and discharge rate.
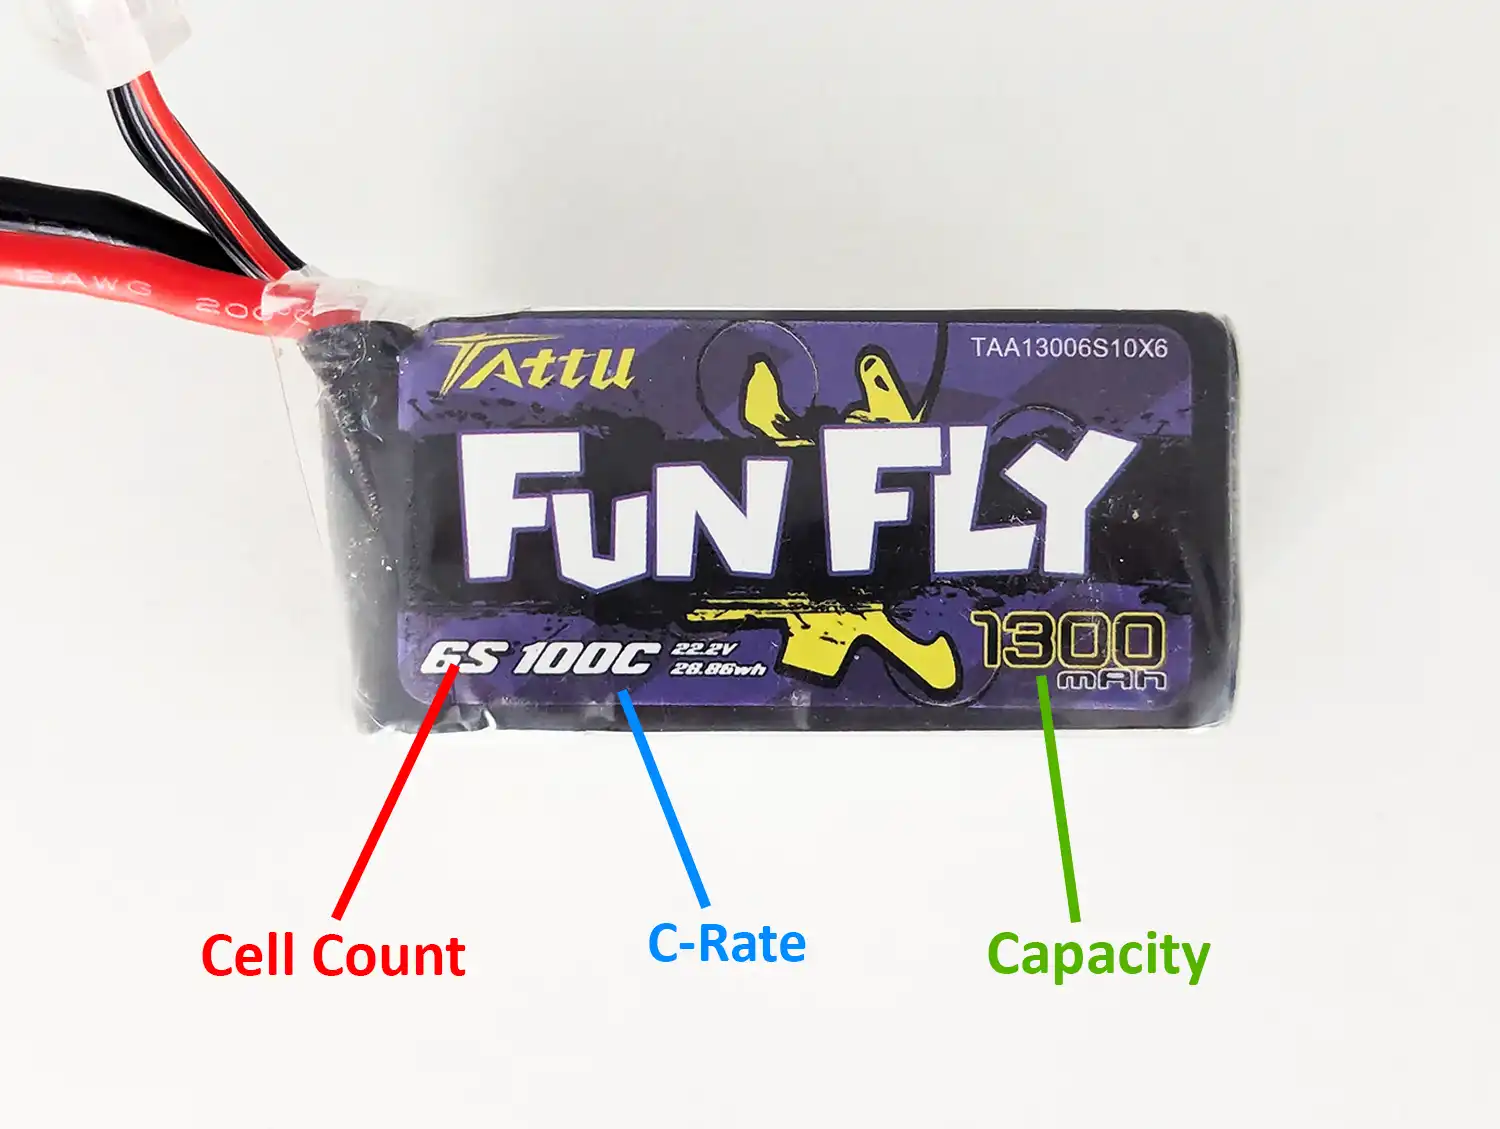
Cell Count
A typical LiPo battery is made up of multiple smaller battery cells connected in series, which adds up their voltages.
The number of cells in series is indicated by the S symbol. For example, a 6S battery has 6 cells connected in series (S stands for Series).
Sometimes you’ll also see a P after the cell count, which indicates the number of parallel groups of cells. For instance, a 6S2P battery has two parallel groups, each consisting of 6 series-connected cells, for a total of 12 cells.
Info
In electronics, connecting power sources (such as batteries) in series increases the total voltage while the current (capacity) remains the same.
On the other hand, connecting them in parallel keeps the voltage the same but increases the available current (capacity).
Voltage
The voltage of the battery depends on its cell count. Each cell has a range of 3.0V to 4.2V, with a nominal voltage of 3.7V. When a cell goes below 3V, it is permanently damaged, and when it goes above 4.2V it may become dangerous and potentially catch fire.
We can calculate the maximum voltage of the battery, knowing its cell count. For example:
- A fully charged 6S LiPo, will have 6 cells each at
4.2V, thus4.2V × 6 (cells)will be25.2V - A fully discharged 4S LiPo, for example (4 cells at
3Veach) will be12V
Warning
There are Hv batteries, which are LiPos but they can be charged to 4.35V per cell.
If you see a battery marked with Hv, you can charge it on the LiHv setting on your charger, but only the batteries that are marked with that. Do not try to charge regular LiPos on that mode, as it is dangerous.
Voltage Sag
It is important to mention that the voltage will sag in flight, and the sag becomes more apparent near the end of the flight.
The discharge curve of a LiPo isn’t linear; once the battery reaches a point (often around 3.4V under load for a typical 4/6S LiPo), the voltage can drop quickly.
Tip
During flight, your drone shows the voltage of the battery by its XT60 lead, it doesn’t know the individual voltages of the cells, even if you set up Betaflight to show the cell voltage, it’s going to simply average it.
This is why it’s important not to fly the battery down to 3V per cell, as some cells might be higher while others dip lower. Furthermore, sag will make the voltage drop fast after you go below around 3.6V.
The only scenario when you might land close to 3V per cell is when flying 1S batteries (like tinywhoops) - and even then, do so carefully.
Capacity
The capacity is a measure of the total electrical charge the battery can store and deliver, measured in milliamp-hours (mAh) and amp-hours (Ah).
1Ah = 1000mAh
For example, a fully-charged 1300mAh LiPo will take exactly 1 hour to deplete under a 1.3A constant load. It would take 30 minutes under a 2.6A (double draw) load. This is in ideal conditions, which is almost never the case.
The drone doesn’t pull a constant current; it changes wildly depending on flight style, motors, weight, and even external variables like wind and altitude. This is why flying cinematically you can have a longer flight time than freestyling or racing.
Tip
Theoretically, more capacity gives more flight time; however this is often misunderstood because higher capacity also means more weight. After a point, the extra weight causes the drone to work harder, reducing flight time instead of improving it.
C Rating
C Rating is the current rating of the battery, indicating how much current you can draw from the battery at once. C in this context means Capacity.
To convert the C Rate to Amps, multiply the Capacity of the battery in Ah by the C-Rate.
For example: Let’s say we have a 1300mAh battery with a C Rating of 120C.
- First, convert the capacity from milliamp-hours to amp-hours:
1300 ÷ 1000 = 1.3A - Next, multiply the capacity in
Ahby the C Rate:1.3 × 120 = 156A
Some batteries will indicate a burst C-Rate, which is the current that the battery can provide during short-term bursts of current (usually less than a few seconds).
Warning
Exceeding a battery’s C-Rate is not good for its health, and over time will damage its internal chemistry, making the battery unable to deliver high current and eventually causing it to get puffy, which is dangerous.
Internal Resistance
The internal resistance (IR) of a battery is the opposition to current flow inside the battery itself. It is measured in milli-ohms (mΩ).
Over time the battery’s IR will increase, which is normal, but eventually it becomes high enough that the battery can no longer deliver current efficiently.
Most modern battery chargers measure Internal Resistance as part of the charging and balancing cycle, it is a great way to track the overall health of your battery, it is the most accurate when nearing full charge of the battery.
The normal IR of a battery differs depending on its capacity, type, and voltage, but here is a general guideline:
| Battery | Normal IR | Fair IR | High IR |
|---|---|---|---|
| LiPo 2S-6S 1-3 Ah | 3 - 15 mΩ | 15 - 25 mΩ | 25+ mΩ |
| LiPo 2S-6S 5-10 Ah | 2 - 6 mΩ | 6 - 15 mΩ | 15+ mΩ |
| Li-Ion 1-3 Ah (18650) | 20 - 40 mΩ | 40 - 70 mΩ | 70+ mΩ |
| Li-Ion 4-6 Ah (21700) | 12 - 25 mΩ | 25 - 40 mΩ | 40+ mΩ |
Battery Connectors
LiPo batteries come with different connectors, and it is important to make sure your drone and charger support the connector on your battery, or you will need an adapter.
Danger
Even if a battery’s connector physically fits your drone, that doesn’t guarantee it’s safe to use.
Unlike standardized plugs such as USB, LiPo battery connectors don’t indicate voltage. This means you could accidentally connect a higher-cell battery to a drone designed for fewer cells. Doing so can fry the ESC and other electronics, often causing permanent damage.
Always check your drone’s supported voltage range before connecting a battery.
With that warning out of the way; the most common connectors used on FPV drones & batteries are:
XT
The XT connector is the most commonly used connector on FPV drones and LiPos. It is the yellow plug with two pins.
- XT60: Most 3S-6S batteries use this connector; it’s yellow and has two pins
- XT30: Smaller version of the
XT60, used on smaller 2S-4S batteries for lightweight builds/cinewhoops that don’t draw much current - XT90: Larger version of the
XT60, mostly used on large cinelifter drones with 6-8S batteries and very high current draw
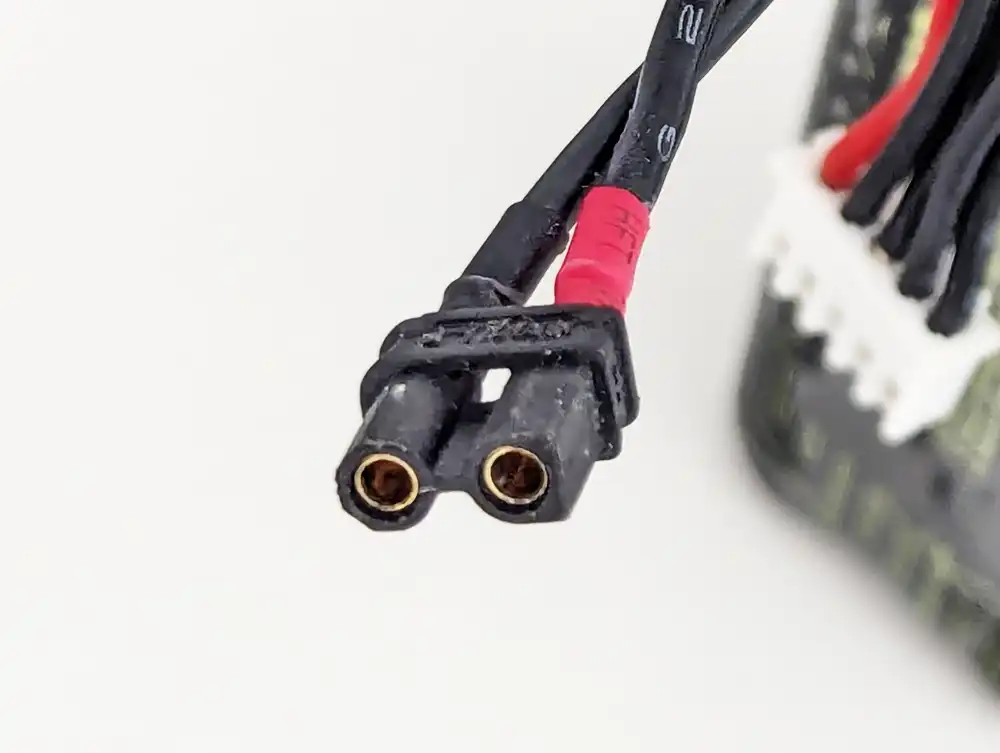
XT30 Connector
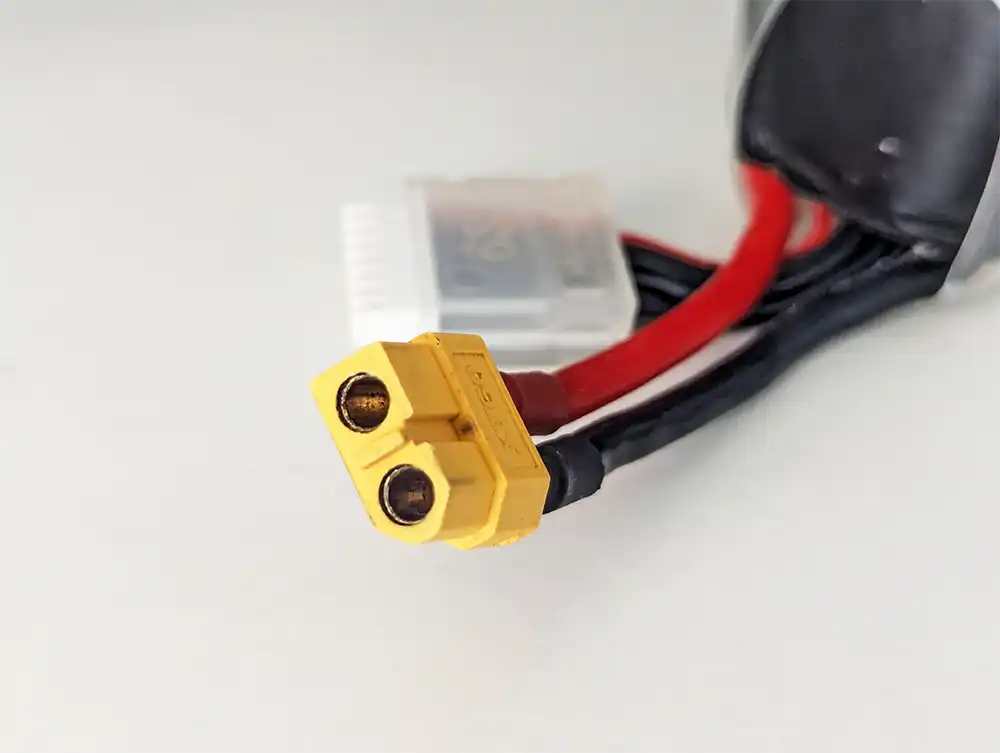
XT60 Connector
Did you know?
The number after the XT in the name refers to the maximum constant amp-draw of the connector.
For example, the XT60 is designed for a maximum of 60A of continous current!
Deans (T-Plug)
The Deans connector, also called T-Plug is an older connector, and was mostly used on RC cars and airsoft gear, nowadays it’s not common to see in drones. It is a red connector with two flat plugs, 90 degrees to each other, in shape of a “T”.
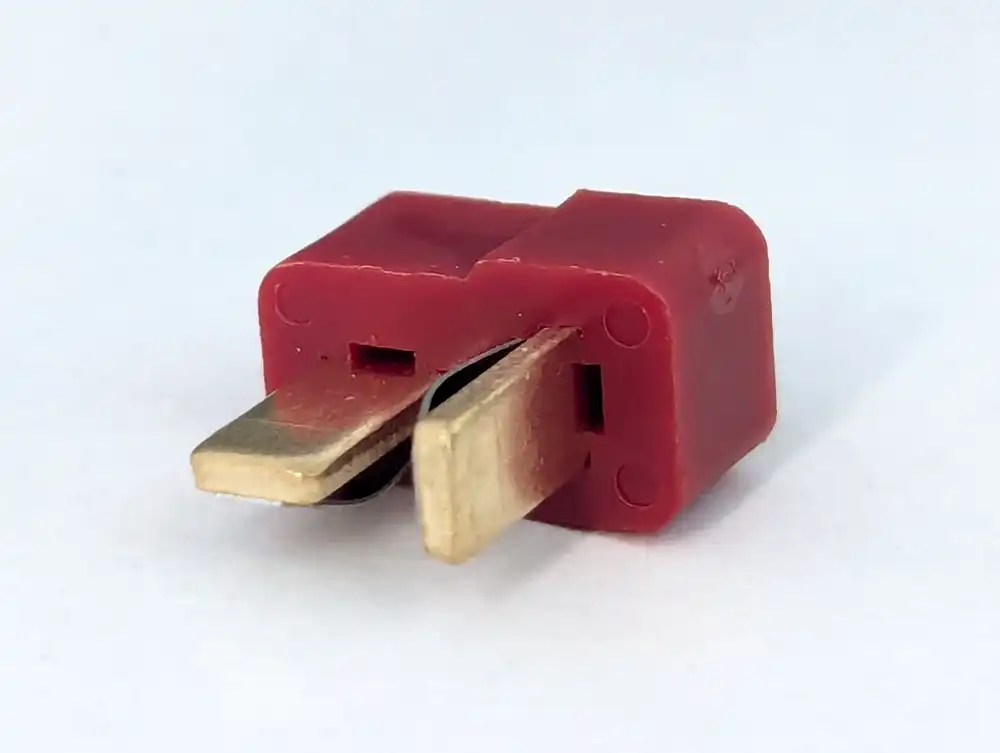
Deans Connector
1S/Tinyhoop connectors
- PH2.0: was very popular on tinywhoops early on. It looks like a JST connector and is only found on 1S batteries, but has largely been replaced by BT2.0/A30
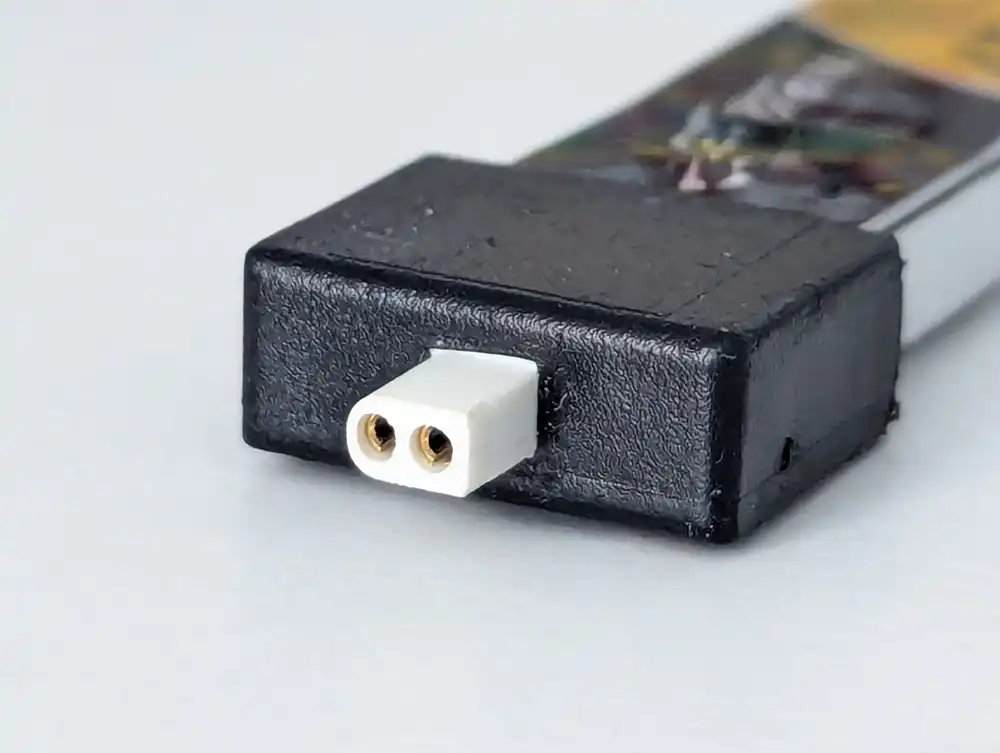
- BT2.0: newer connector, replacement for PH2.0; has lower resistance, increasing flight time and power. Designed and manufactured by BetaFPV
- A30: made by GNB; a competitor to BT2.0. Some BT2.0 drones are compatible with A30 batteries, but compatibility is not standardized
- NX69: a very new connector by NewBeeDrone; not yet widely used
BT2.0 Connector
Balance Connector
Batteries that have more than one cell will have a second plug with multiple wires, often referred to as the Balance Connector. This is necessary to keep the cells in balance during charging.
The connector is called JST-XH. The number of pins corresponds to the number of cells in the pack plus one
Did you know?
You can figure out the number of cells in a battery just by looking at the balance connector. Count the wires and subtract one - that’s your cell count.

JST Balance connector of 6S LiPo
Battery safety
It is crucial to monitor your batteries for signs of damage to the battery, failure to do so might increase the danger of fire.
Here are some signs that your LiPo is no longer safe to use:
- Swollen battery/cell
- Physical damage: like a bent battery, scratched cell, slight puncture
- High voltage sag
- Cell out of balance
- IR of one cell significantly different
- Fruity smell: the battery is leaking harmful chemicals and gases, move to a safe (outdoor) place immediately
- Hot during charging: stop charging immediately
Choosing a battery
Firstly, the battery voltage (cell count) should match the one your drone is designed for.
Capacity is trickier because most manufacturers do not indicate an ideal value for your build. Choosing a pack that is too large adds unnecessary weight; too small and it cannot supply sustained current, making the drone feel underpowered.
LiPo
LiPos are the most common type of batteries on FPV drones, they deliver very high current, giving good performance, but not much flight time (relatively speaking).
If you’re building a freestyle or racing drone, LiPo will definitely be the option you would want.
Chart for reference depending on drone size:
| Drone Size | Typical Voltage (cells) | Recommended Capacity (mAh) |
|---|---|---|
| 65mm | 1S | 350 |
| 75mm | 1S | 450 |
| 85mm | 1S - 2S | 450 - 550 |
| 2 - 2.5“ | 2S - 3S | 300 - 650 |
| 3 - 4“ | 3S - 4S | 650 - 1100 |
| 5“ | 4S - 6S | 1300 - 1800 |
| 7“ | 4S - 6S | 1800 - 3000 |
| 10“ | 6S - 8S | 4000 - 6000 |
LiIon (for Long Range)
LiIon batteries on FPV drones are less common, as they cannot provide powerful current bursts like LiPos can, so they’re mostly limited to long-range builds. Their energy density is higher, meaning that for the same physical size you often get higher capacity, but also more weight.
Here’s a chart for reference:
| Drone Size | Typical Voltage (cells) | Recommended Capacity (mAh) |
|---|---|---|
| 2 - 2.5“ | 2S - 3S | 650 - 1000 |
| 3 - 4“ | 3S - 4S | 1000 - 2200 |
| 5“ | 4S - 6S | 3000 - 4000 |
| 7“ | 4S - 6S | 4000 - 6000 |
| 10“ | 6S - 8S | 6000 - 10000+ |
Maintaining battery health
We all want our batteries to last as long as possible; here are some tips to extend their life!
Storing Batteries
Storing batteries properly can significantly extend their life.
Batteries hate extreme environments, such as being in cold or hot environments, especially when flown aggressively in such conditions.
Lithium batteries also hate being fully charged or empty during extended periods of time. This is why storage charging is important.
If you know that you’re not going to fly the battery for a few days (especially a week or more), run the storage program on your charger to bring it to a ~50% charged state. The cells degrade much less when stored there.
Flying in cold weather
When flying in the winter in sub-zero temperatures, store the batteries in a warm bag or under your jacket. Do not let them cool down significantly. You might notice reduced performance and flight time; that’s normal. After returning home, let them warm to room temperature before charging.
When I was flying in Ukraine during winter, I would hover the drone for about 20 seconds after takeoff to warm the battery before doing aggressive moves. This helps prevent chemical stress that can slowly lead to swelling.
This is especially important on Li-Ion batteries that have more sag, and even more so on Mavics, because their smart batteries may force-land the drone if a cell goes below 3V at any time.
Do not fast-charge unnecessarily
We will talk about charging in detail below, however something important to mention is that fast charging reduces the life of your LiPos unnecessarily. Most of the time, sticking to 1C is the best option. Only increase the rate if you truly need faster turnaround.
Monitor and log battery state
Apart from monitoring for crucial signs of failure, it is also a good idea to label your batteries and log any signs you see, such as slight imbalance of voltage after flight, the battery being significantly warmer than usual, or just the charge cycle the battery has.
I also log the Internal Resistance of the battery after its first charge cycle to establish a baseline for future comparison.
Choosing a charger
Choosing the right charger is important. Make sure the charger is from a reputable brand like HOTA or ISDT; avoid unbranded low-quality units.
My personal recommendations for 2S+ chargers:
- HOTA D6 Pro: dual-channel, AC input
- HOTA S6: dual-channel, AC input, USB-PD output (great for charging remotes), my current charger
- ISDT 608PD: single-channel, USB-PD input (can charge from a powerbank)
- HOTA T8: single-channel, DC input only
Recommendations of 1S (tinywhoop packs) chargers:
- ViFly Whoopstor V3: best all-round 1S charger, 6 individual channels, works from USB-PD, XT60 or barrel jack
- GEPRC WooPower W63: more modern, fully-featured 1S charger, 6 individually controllable channels, mAh tracking and more
Charging LiPo Batteries
Knowing how to properly charge batteries is very important, as it is the step during which most dangerous mistakes can occur.
Caution
Do not charge near flammable areas and don’t leave batteries charging unattended or overnight.
Ideally monitor the state of the LiPos regularly; being in the same room is usually enough.
Safe charging place
It is important to choose a safe place to charge your batteries.
You don’t think so much about this with regular batteries such as the ones in your phone or laptop, but they aren’t being abused so hard as the LiPos we fly on our quads. This is exactly why you cannot be too safe when handling drone LiPos.
Do not charge near highly flammable surfaces, outdoors is a great idea. Some people charge inside their grill, or inside the oven; while I find these a bit overkill, they are still a good idea and something you might want to consider.
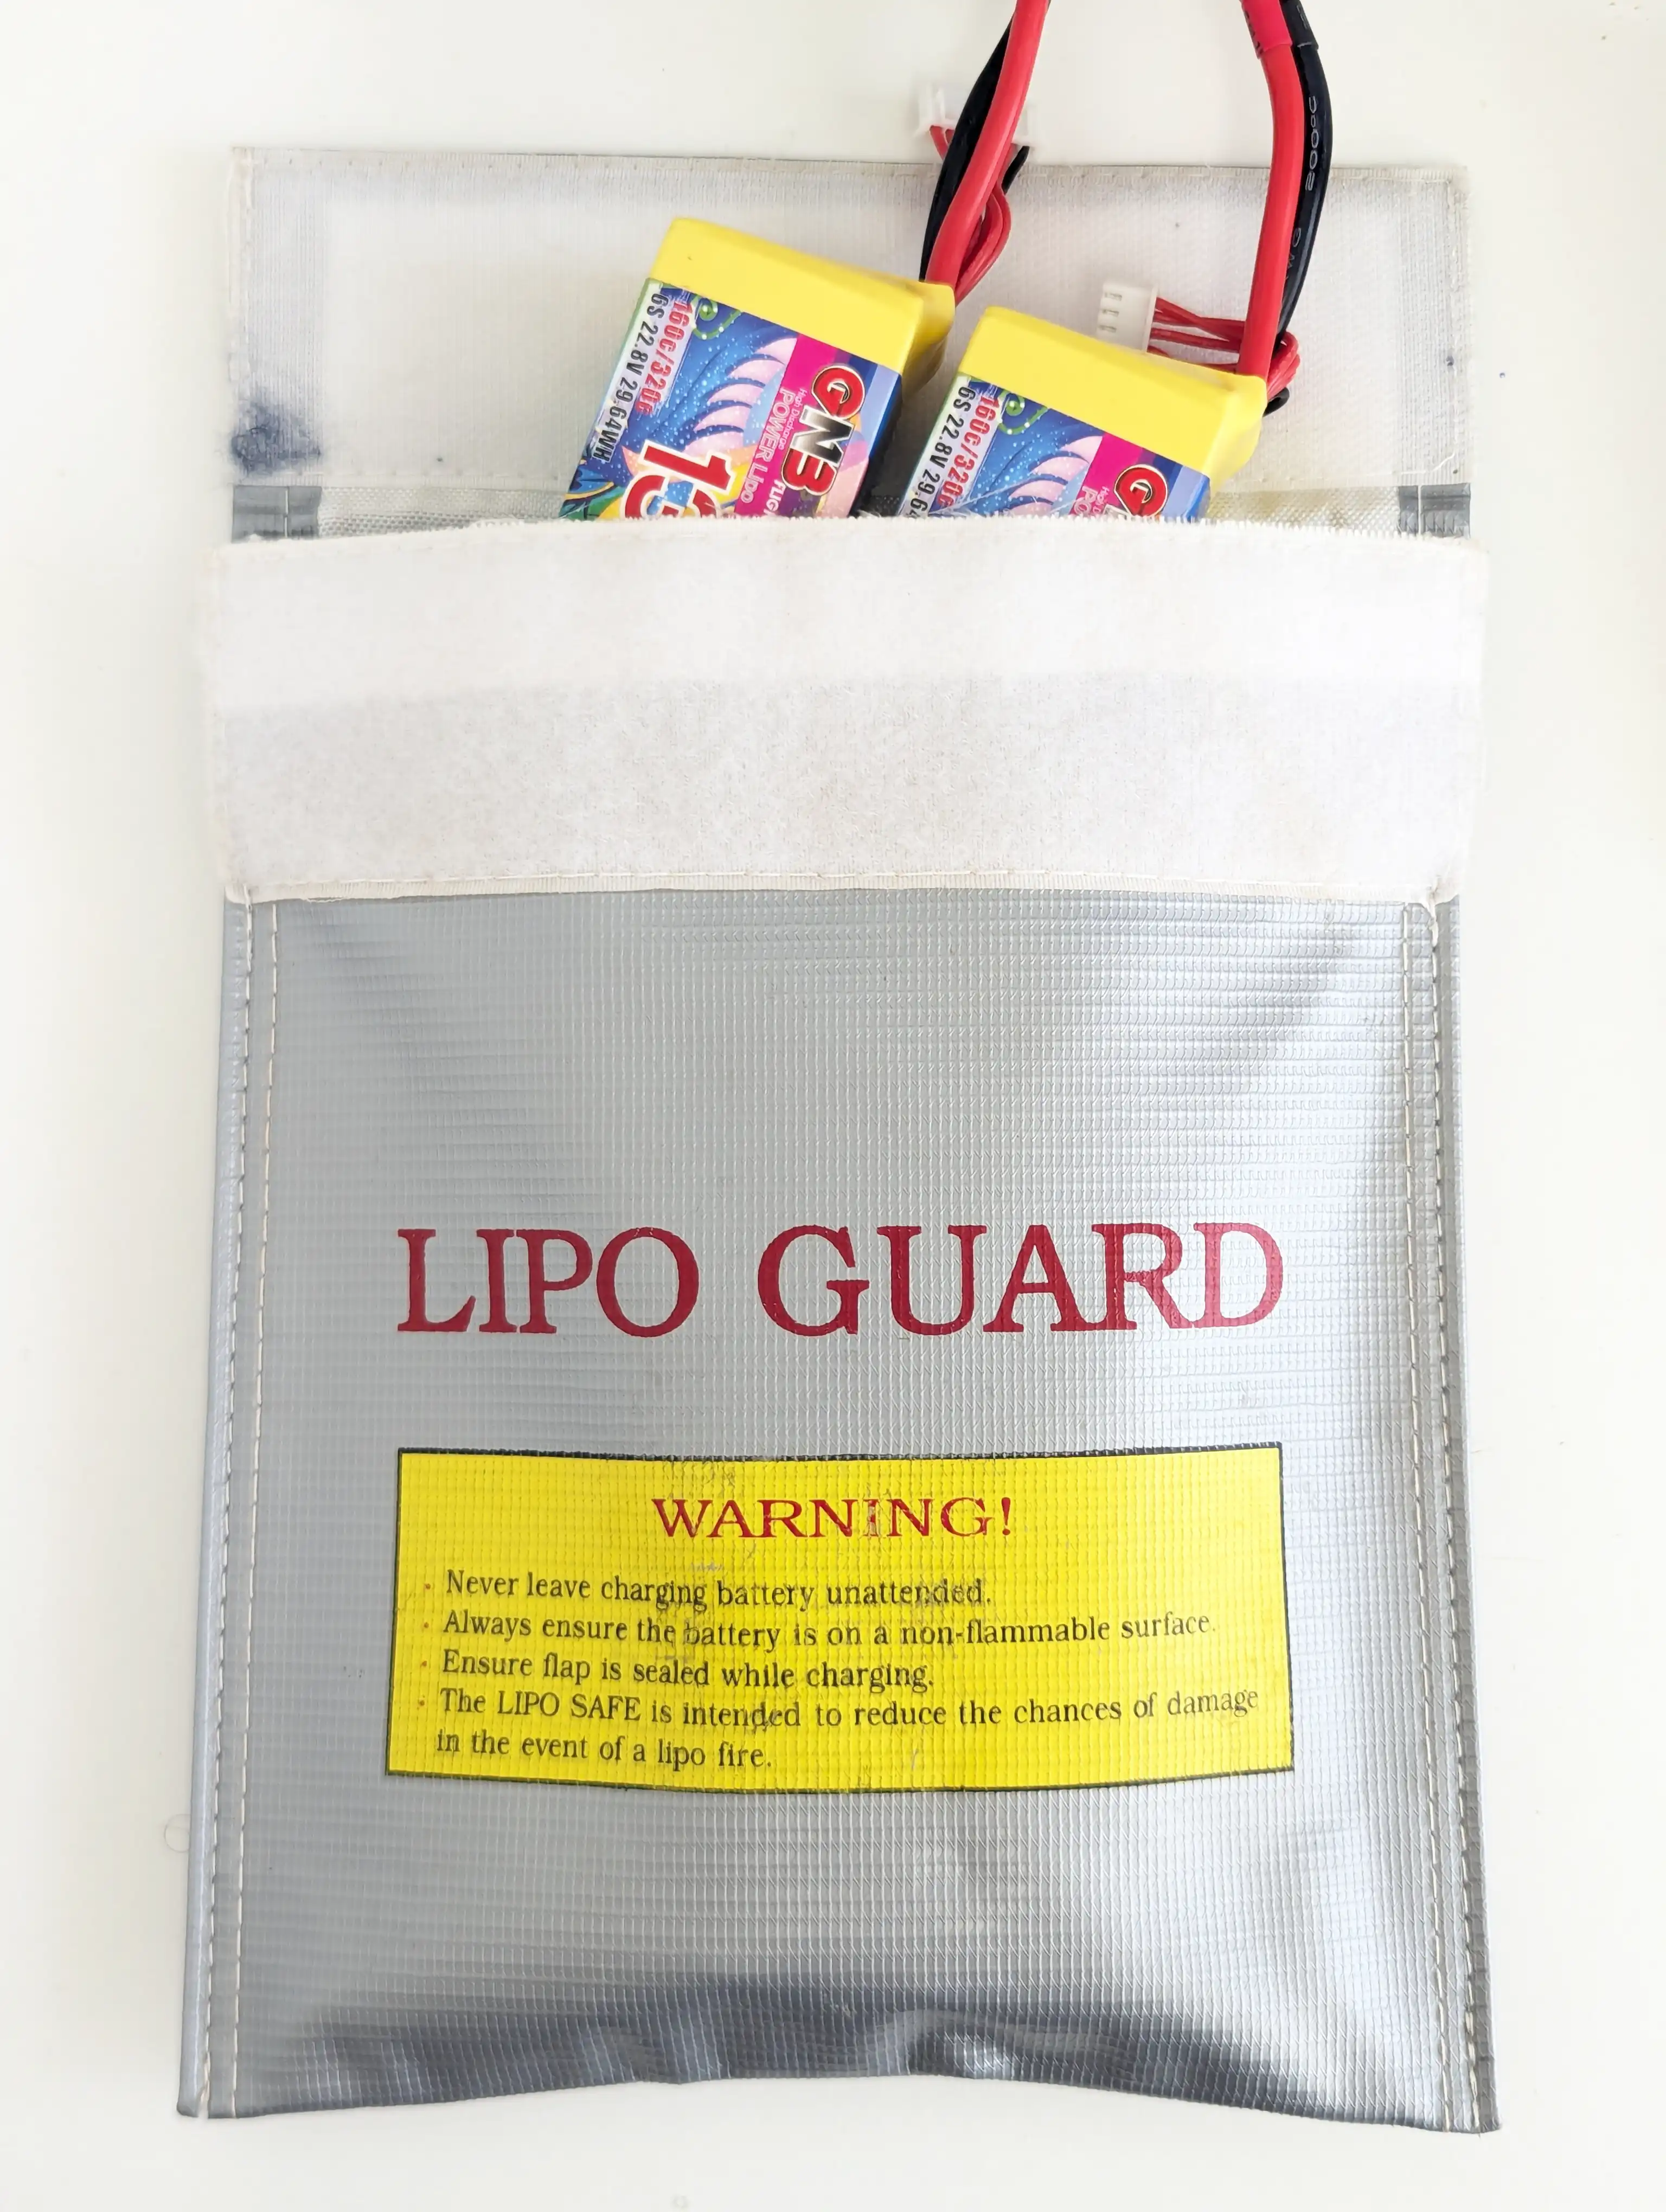
Another thing people use is LiPo safe bags. They are fire-resistant bags to put your batteries in while charging. They are generally a good idea; however I personally do not use them as I like to see the batteries visually while charging. I mainly use these bags for travel (more on that later).
Visual inspection & gathering specs
- Before charging a battery, inspect it visually for damage, if you notice it’s puffy, or has any physical damage to the cells, do not charge it.
- Next, determine the type, cell count and capacity of the battery, this info will be needed to set up the charger.
Calculating the charging rate
It is generally advised to charge LiPos at 1C, this means 1 Capacity. For Li-Ion batteries, it should be even lower, typically 0.5C.
For example, a 1300mAh battery should be charged at 1.3A (1300mAh = 1.3Ah), a 2000mAh battery should be charged at 2A and so on…
When charging at 1C, it will take about 1 hour. Faster rates like 2C (double the capacity in amps) reduce charge time but increase stress and risk.
The tradeoff here is safety and battery health in the long run. If possible, stick to 1C charging.
Danger
Most LiPo batteries can support up to 2C charging without issue (assuming they have not been damaged or abused). Usually the label on the back indicates the max rate.
Li-Ions should be only charged at 1C maximum, however 0.5C is recommended.
LiPo safety is a sliding scale: the faster the charging, the more likely something will go wrong.
Only you can decide where on that scale you want to be.
I consider anything above 4C to be reckless. My general rule is not to charge above 2C indoors. If you’re at a race and need rapid turnaround, you might push up to 5C - but only in an environment where a failure would not cause damage.
Connecting the battery to the charger
Once the charger has been powered up, plug in the battery to the charger. The order doesn’t really matter, but I always like to plug in balance lead, then main lead, and disconnect in the opposite order.
You might notice a little spark when connecting the main lead, this is normal and expected.
For 2S and higher cell counts, it is very important to connect both the balance plug and the main lead (XT60 or other) during charging. The balance lead is essential to balance voltages of the cells. Some chargers will let you charge without this connected, and that can cause a safety issue.
Setting up the charger
Different chargers might have a bit different interfaces, but all of them will ask for the following info to start a charge:
- Battery type: this is very important to get correct. Most batteries on FPV drones are LiPos, however there are also LiHv, which are essentially higher voltage LiPos. The charger usually will not warn you if this is set wrong, and setting it incorrectly might lead to fire.
- Program/Mode: for charging, set this to Charge, in the next part of the article, I’ll explain why Storage and other modes are for and why they can be useful.
- Battery voltage/cell count: another very important property, however most modern chargers can automatically determine this using the balance lead. I recommend always setting this manually though because if your battery has a dead cell, the charger might not pick this up and it will cause a safety issue.
- Charge rate (amperage): set the charging rate you have determined in the above section, stick mostly to 1C as mentioned (
1Cis NOT1A, don’t confuse that)
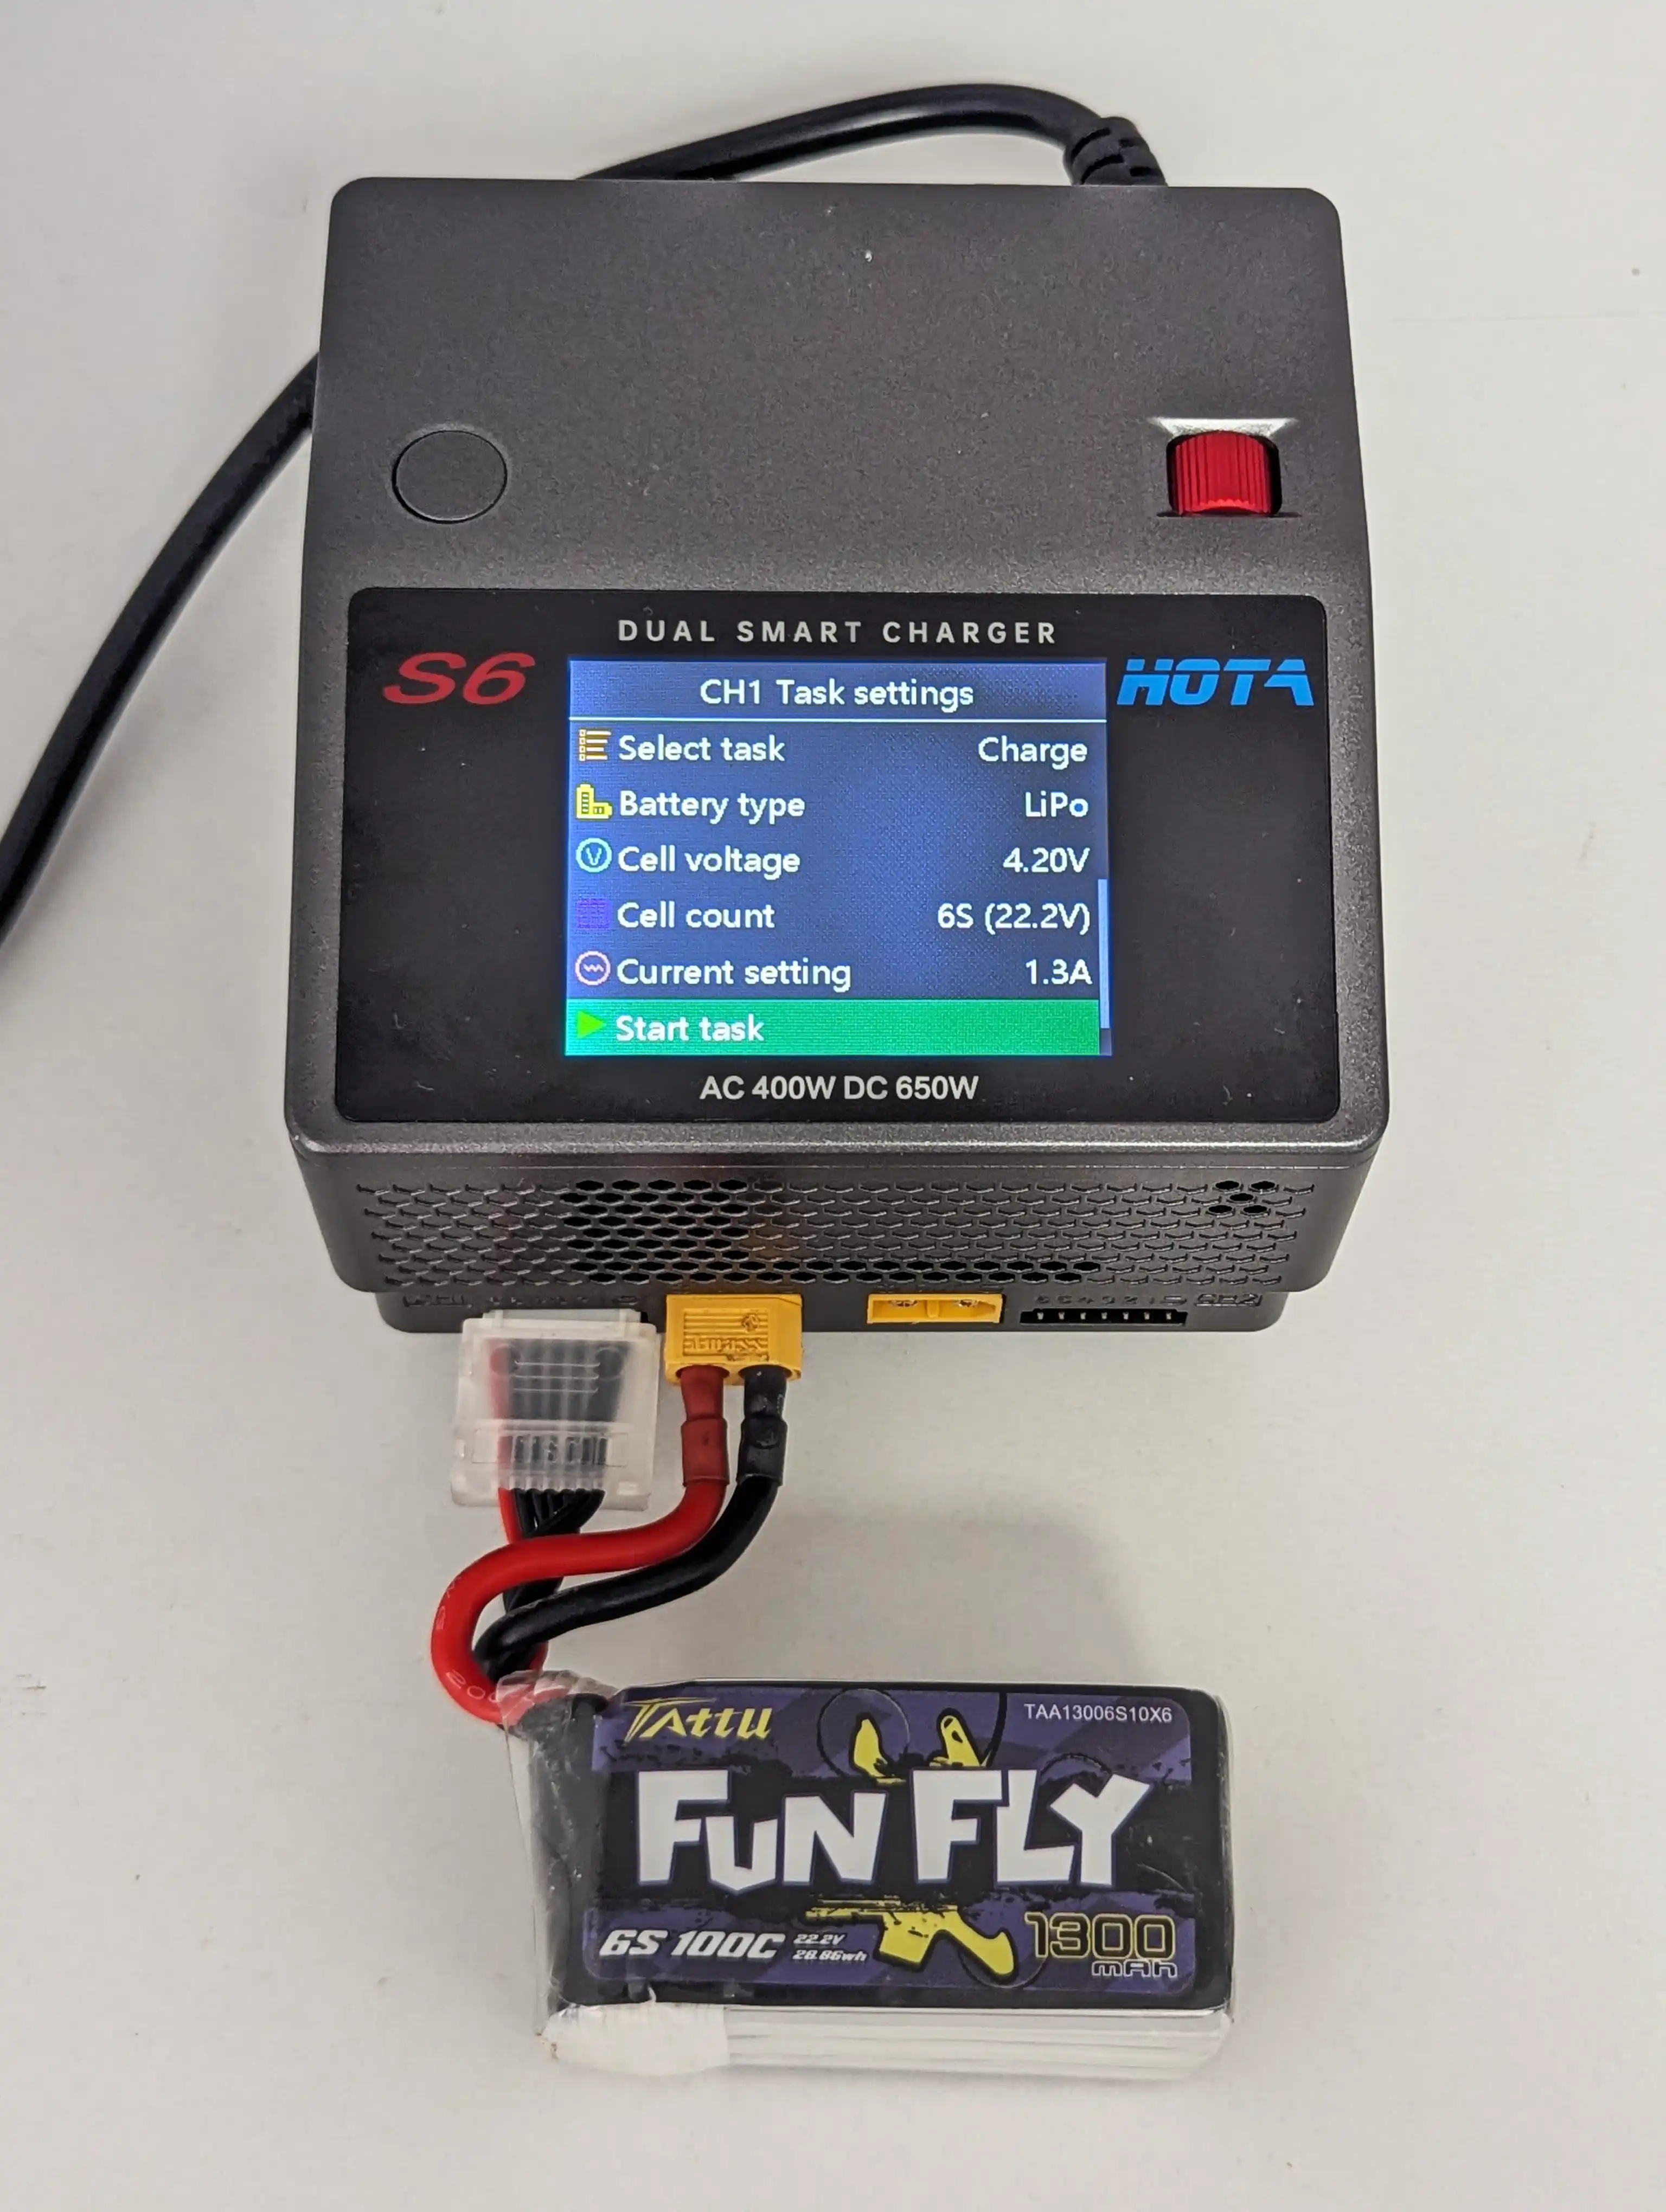
As you can see above, I set my charger to Charge, LiPo, Cell Count to 6S (even though it auto-detected it), and Current Setting to 1.3A, which is 1C for a 1300mAh LiPo.
Charger modes
For the most part, the mode you’ll use most frequently will be Charge, however there are other useful modes - let’s explore them!
- Storage: brings the battery to
3.85V/cell(about 50% charged). If you’re not going to fly in a few days, run this to leave them in a good state. LiPos don’t like sitting fully charged or fully discharged. - Discharge: takes batteries down to around
3V/cell. Not used often, but if a battery is misbehaving or damaged you can lower its energy so if something fails, there’s less fuel. - Balance: balances the cells without charging, then stops. (Charge and Storage modes also balance.)
- Destroy: rare mode; fully discharges to
0Vfor disposal.
Warning
Some older 4-button style chargers like the Imax B6 do NOT balance in regular charge mode. Always read the manual first.
I highly recommend staying away from older 4-button style clones (especially Imax B6 clones). They are notorious for failures.
Monitoring the charging process
During charging, it is important to monitor the battery to make sure everything is going smoothly. This does not mean you have to be watching the battery as it’s charging all the time, being in the same room is usually enough.
Danger
Never leave your batteries charging home alone or overnight!
Remember: Charging is the process during which your batteries are most prone to failure!
I recommend watching for signs of failure, if you see any of the following, stop charging immediately:
- Battery getting puffy
- Battery unusually hot: LiPos shouldn’t heat up at all during charging, LiIons might get a bit warm
- Fruity smell: shut off immediately and take it outside; it’s likely about to vent
- Unbalanced cells: if you see that one of the cells is out of balance when you start charging, drop the charging rate and wait for it to stabilize. Mark the battery with a sharpie or tape to keep an eye out on any future possible signs of failure
- Battery taking unusually long to charge: this might show degradation in its chemistry, if you notice this, check the IR of the cells, if it’s not balanced, consider retiring the battery
Tracking charging state
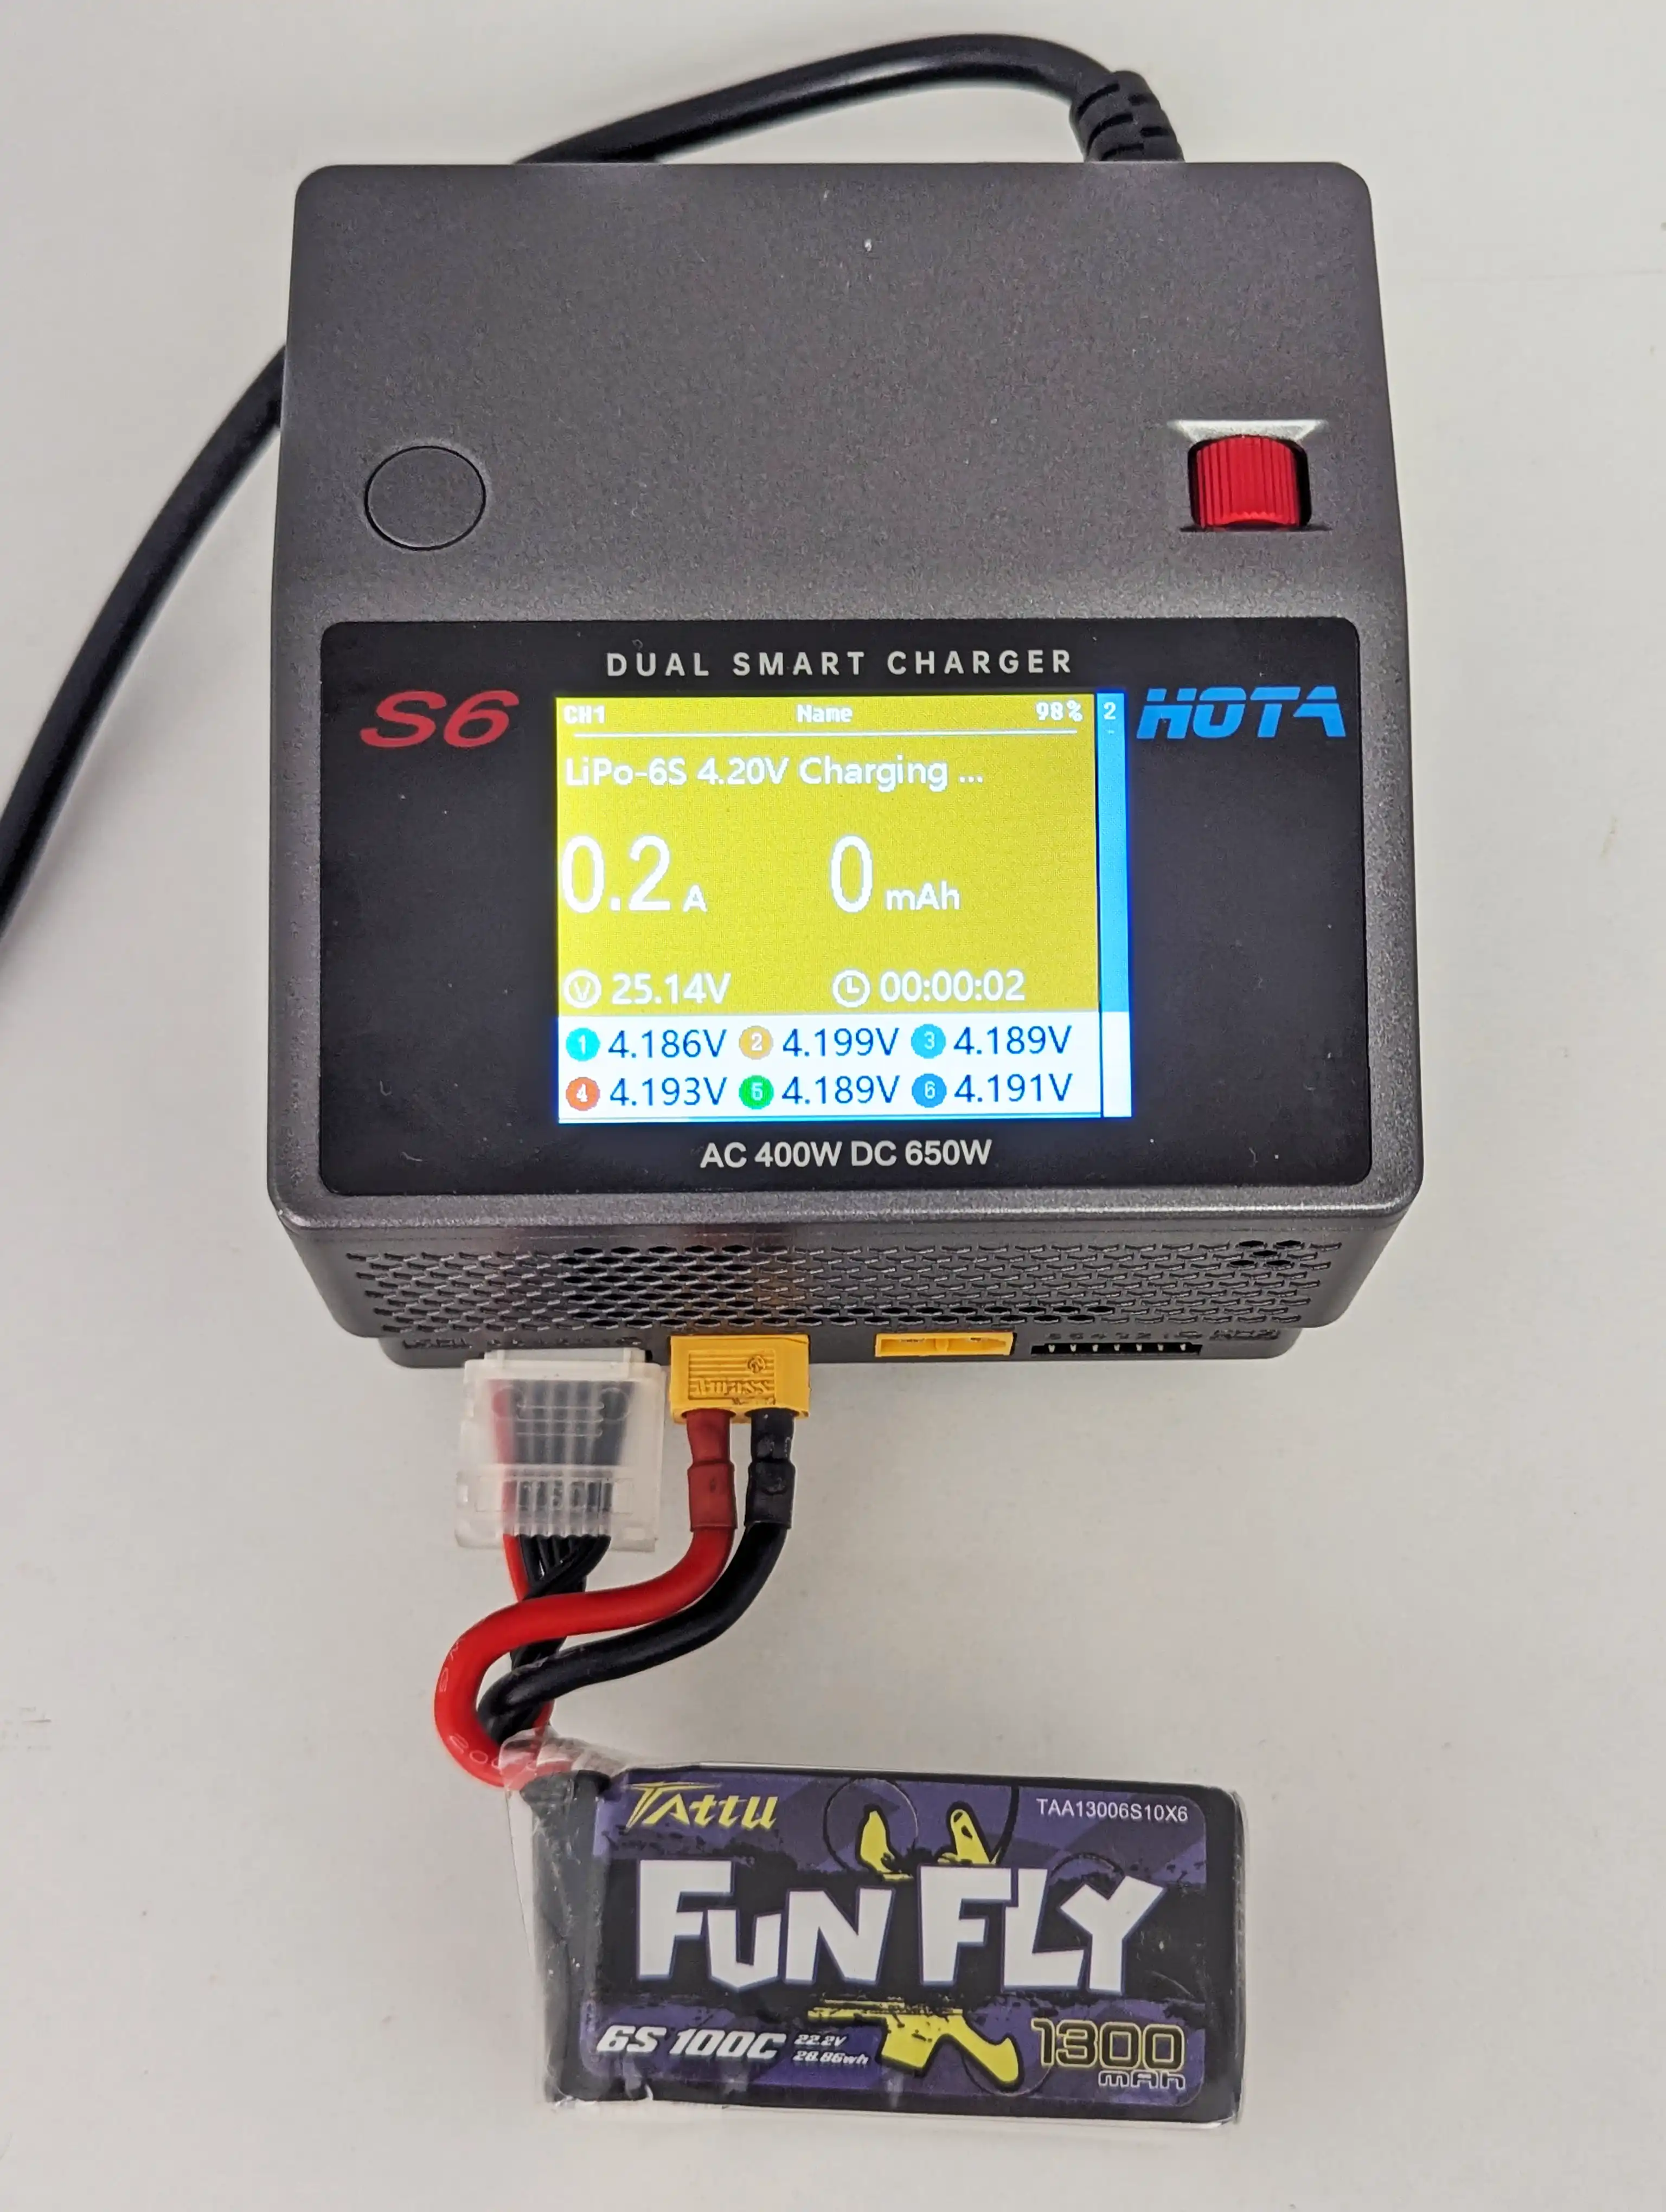
Most chargers will show you the following properties during charging:
- Voltage of the main lead (in
V) - Voltage of individual cells (in
V) - Current that the battery is being charged at (in
A) - Capacity put into the battery (in
mAh) - Internal Resistance of each cell (in
mΩ)
As mentioned before, LiPo batteries top out at 4.2V per cell.
As the battery approaches this state, you’ll see the current drop from the one set at the beginning of the charging cycle, slowly dropping down close to 0A as the battery is nearing full.
Tip
As the battery is nearing its charging cycle, some chargers will show Fast-charge done, this means that the battery is almost done charging.
Once the battery is fully charged, they’ll show Charge done.
Some chargers will also try to trickle-charge the battery, maintaining it at 4.2V/cell until you stop the cycle, while others will notify you that it’s done charging, and cut out the current.
Once a battery is done charging, stop the charging program, then disconnect it.
Storage charging
I’ve mentioned the idea of storage charging earlier, let me explain what it is exactly and why it is necessary:
Lithium batteries are most stable when they are near 50% charged. They do not like to be completely full or completely empty for long periods of time.
If you know you’re not going to fly for some time (72h+ after charging), put the battery into storage.
It is done similarly to charging, but setting the mode to Storage on the charger, otherwise the process is the same, setting the charging rate, plugging both leads, etc.
The storage program will charge the battery to 3.85V/cell if it’s below that, or slowly discharge it to that if it’s fully charged.
This can take a while, especially if discharging; most LiPo chargers use resistors for discharge (turning energy into heat). There are faster external dischargers you can buy if you do this often.
Parallel charging
I would not recommend parallel charging at all.
I will not show how to do this - there are online guides - but I strongly discourage using parallel boards. Things can go wrong quickly, damaging batteries or causing fire.
Get a dual-channel charger instead! Like the Hota D6 Pro, Hota S6, or similar. Having 2 independent charging channels is very useful!
Traveling with LiPo batteries
Most airlines allow you to bring LiPo batteries on board. They usually do not require anything specific; however here are some good tips to do it safely:
- Always in your carry on: Batteries of any kind are only allowed with you on the plane in your carry-on luggage, never in checked baggage
- Never bring damaged batteries: if you know that a LiPo is slightly damaged, out of balance, or nearing the end of its life, do not risk bringing it with you
- Storage charge the batteries: as mentioned in the section above, when a battery is near half-charged, it experiences less stress, this will make it take less damage with the slight pressure changes
- Carry a them in a LiPo safe bag: if you have one, it is a good idea to place them in one, just for safety. However it is not required by many airlines
Tip
If your charger is AC, make sure it supports the voltage of the mains electricity of the country you’re travelling to.
You might need to buy an adapter for the plug, but mains AC voltage is something to check as well.
Luckily, most AC chargers nowadays support 110-240V 50/60Hz, essentially all countries.
Safely disposing of batteries
Throwing LiPos in the trash is not a good idea. Although they’re not as harmful environmentally as some other chemistries, their main danger is flammable material when charged.
LiPos should be completely discharged before disposal.
This can be done in a few ways; here are some of the safer ones.
Charger destroy mode
Some chargers like ISDT ones, have a Destroy option, which drains the battery until it reaches 0V. If your charger has this feature, the easiest way to kill a battery is to run this program, it will take a long time, but it works and it is the safest method.
Light bulb or resistor
If you have a halogen light bulb that’s rated for the voltage of the battery, you can connect the LiPo to the bulb, and slowly let it discharge until it hits pretty much 0V.
Another way is to get a big wirewound resistor, and connect the battery to it. This will drain the battery slowly as well.
Salt bath
This is a slow method, but it also works:
- Get a bucket, fill it up with regular water
- Generously mix salt, about 35-40g of salt per 1L of water
- Place the battery in the salt water
- Place the bucket outside, as this process generates chlorine and hydrogen gases, which are toxic and flammable respectively
- Leave it there for a week or two, until it completely discharges